Ubuntu Firewalld Full Practical Guide for Developers
A clean, practical reference for building a secure Ubuntu server with Firewalld, Nginx reverse proxy, Docker, Node.js, Python apps, and production hardening.
Recommended stack
- Ubuntu Server
- Firewalld
- Nginx
- Docker
- Node.js / Python
- Fail2ban + HTTPS
Contents
1) Firewalld overview
Firewalld is a dynamic, zone-based firewall manager for Linux. It is well suited to Ubuntu servers that run multiple services, reverse proxies, containers, or developer workloads. It separates runtime changes from permanent configuration, making it flexible for testing and safer for production.
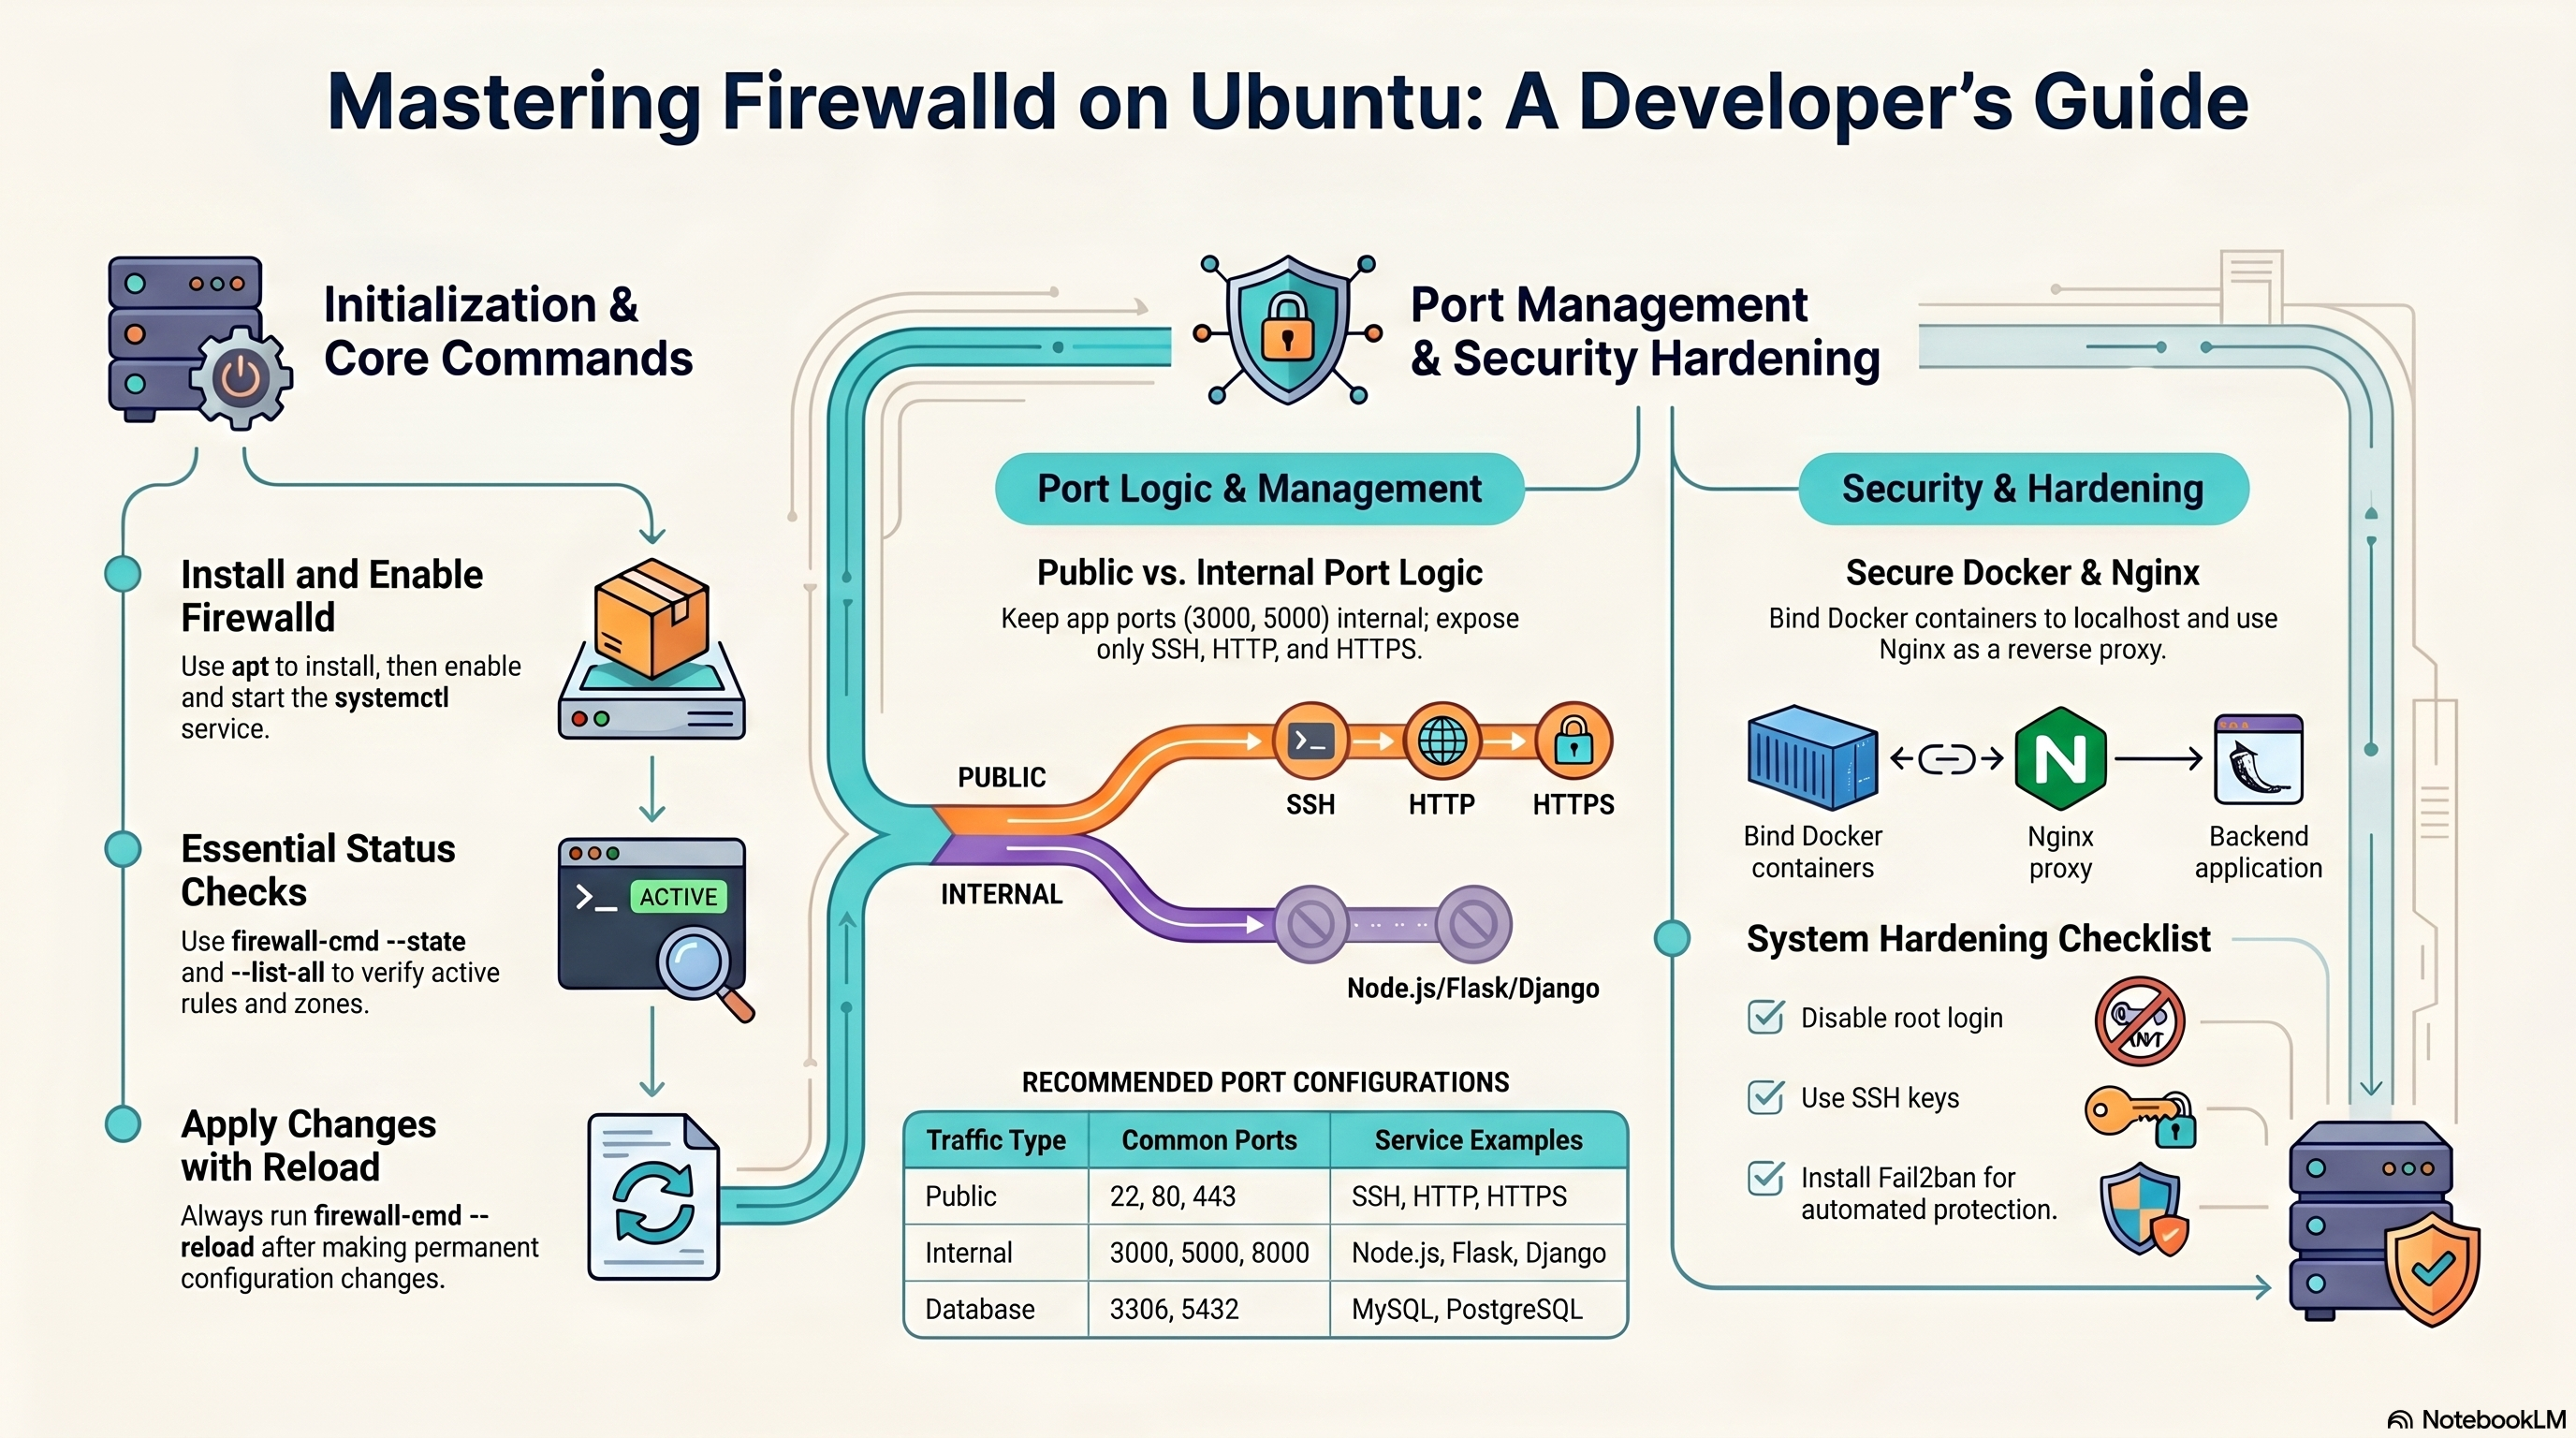
2) Install and start on Ubuntu
sudo apt update
sudo apt install firewalld -y
sudo systemctl enable firewalld
sudo systemctl start firewalld

sudo firewall-cmd --state
sudo systemctl status firewalld
Use enable to start on boot and start to run now.
3) Core commands you will use every day
| Action | Command | Why it matters |
|---|---|---|
| Show active zones | sudo firewall-cmd --get-active-zones | See what zone is applied to interfaces |
| Show all current rules | sudo firewall-cmd --list-all | Quick current firewall summary |
| Open SSH | sudo firewall-cmd --permanent --add-service=ssh | Remote administration |
| Open HTTP | sudo firewall-cmd --permanent --add-service=http | Web traffic on 80 |
| Open HTTPS | sudo firewall-cmd --permanent --add-service=https | Secure web traffic on 443 |
| Open custom port | sudo firewall-cmd --permanent --add-port=3000/tcp | Only when really needed |
| Remove custom port | sudo firewall-cmd --permanent --remove-port=3000/tcp | Close exposure again |
| Reload | sudo firewall-cmd --reload | Apply permanent changes |
4) Zones explained simply
Zones define the trust level of a network or interface. In most public server use cases, public is the right default.
public
Default choice for internet-facing servers.
home / work
More permissive for trusted local environments.
trusted
Accepts nearly everything. Use with care.
drop
Silently drops incoming traffic.
sudo firewall-cmd --get-default-zone
sudo firewall-cmd --set-default-zone=public
5) Developer port strategy
Open publicly
- 22 - SSH
- 80 - HTTP
- 443 - HTTPS
Keep internal only
- 3000 - Node.js
- 5000 - Flask
- 8000 - Django / Gunicorn
- 3306 - MySQL
- 5432 - PostgreSQL
The safest pattern is: Internet → Nginx on 80/443 → localhost app port.
6) App deployment pattern
The same principle applies to any language: bind the app to localhost and let Nginx handle the public-facing traffic. Firewalld only needs to open http, https, and ssh.
# Always open only these three publicly
sudo firewall-cmd --permanent --add-service=ssh
sudo firewall-cmd --permanent --add-service=http
sudo firewall-cmd --permanent --add-service=https
sudo firewall-cmd --reload
Node.js
127.0.0.1:3000
Express, Fastify, Next.js, etc.
Flask / FastAPI
127.0.0.1:5000
Use Gunicorn in production.
Django / Gunicorn
127.0.0.1:8000
Never run runserver in production.
--timeout so it auto-expires and you cannot lock yourself out.sudo firewall-cmd --add-port=8080/tcp --timeout=120 — opens for 2 minutes then closes automatically.
7) Docker + Firewalld best practice
Publishing a Docker port makes it reachable from outside by default. If you bind it to 127.0.0.1, only the host can reach it.
# Safer: localhost only
docker run -d -p 127.0.0.1:3000:3000 myapp

# Riskier: public on all interfaces
docker run -d -p 3000:3000 myapp8) Nginx reverse proxy pattern
Nginx is ideal for exposing a clean public entry point while applications stay internal.
Internet user
80 / 443 public
127.0.0.1:3000 / 5000 / 8000
HTTP proxy config
server {
    listen 80;
    server_name example.com;

    location / {
        proxy_pass http://127.0.0.1:3000;
        proxy_set_header Host $host;
        proxy_set_header X-Real-IP $remote_addr;
        proxy_set_header X-Forwarded-For $proxy_add_x_forwarded_for;
    }
}
HTTPS with Certbot (recommended)
# Install Certbot for Nginx
sudo apt install certbot python3-certbot-nginx -y

# Obtain and auto-configure certificate
sudo certbot --nginx -d example.com

# Certbot modifies the server block to add:
#   listen 443 ssl;
#   ssl_certificate     /etc/letsencrypt/live/example.com/fullchain.pem;
#   ssl_certificate_key /etc/letsencrypt/live/example.com/privkey.pem;
# and adds an HTTP → HTTPS redirect automatically.

sudo nginx -t
sudo systemctl reload nginxsudo systemctl status certbot.timer.
9) Logging and debugging
When a connection is silently blocked, the first thing to do is enable logging for denied packets so you can see what firewalld is dropping.
Enable denied-packet logging
# Log all denied connections (shows up in journalctl)
sudo firewall-cmd --set-log-denied=all

# Other options: unicast, broadcast, multicast, off
sudo firewall-cmd --get-log-denied

# Watch denied packets live
sudo journalctl -f | grep -i REJECT
View firewalld logs
sudo journalctl -u firewalld -n 50 --no-pager
sudo journalctl -u firewalld --since "10 minutes ago"
Test without locking yourself out
# Open a port for 60 seconds only — auto-closes, safe to test remotely
sudo firewall-cmd --add-port=8080/tcp --timeout=60

# If everything looks good, make it permanent
sudo firewall-cmd --permanent --add-port=8080/tcp
sudo firewall-cmd --reloadtmux or screen session. If the connection drops, the session persists and you can reconnect.
10) Security hardening checklist
Keep your attack surface small.
Prefer key-based login over passwords.
Set
PermitRootLogin no in /etc/ssh/sshd_config.Block repeated bad login attempts.
Apply security patches regularly.
Terminate TLS in Nginx with a valid certificate.
sudo apt install fail2ban -y
sudo apt update && sudo apt upgrade -y
11) Advanced Firewalld cheat sheet with examples
A. Services and ports
sudo firewall-cmd --permanent --add-service=ssh
sudo firewall-cmd --permanent --add-service=http
sudo firewall-cmd --permanent --add-service=https
sudo firewall-cmd --permanent --add-port=3000/tcp
sudo firewall-cmd --permanent --remove-port=3000/tcp
sudo firewall-cmd --reload
B. Runtime vs permanent
# Runtime only (temporary until reload/restart)
sudo firewall-cmd --add-port=8080/tcp

# Permanent (survives reload and reboot)
sudo firewall-cmd --permanent --add-port=8080/tcp
sudo firewall-cmd --reload
C. Inspect configuration
sudo firewall-cmd --state
sudo firewall-cmd --get-active-zones
sudo firewall-cmd --get-default-zone
sudo firewall-cmd --list-all
sudo firewall-cmd --zone=public --list-all
D. Rich rule — allow from trusted IP only
# Allow SSH only from a specific IP address
sudo firewall-cmd --permanent --add-rich-rule='rule family="ipv4" \
source address="203.0.113.10/32" service name="ssh" accept'
sudo firewall-cmd --reload
E. Rich rule — rate limiting (brute-force protection)
# Limit SSH to 3 new connections per minute per source IP
sudo firewall-cmd --permanent --add-rich-rule='rule family="ipv4" \
service name="ssh" limit value="3/m" accept'
sudo firewall-cmd --reload
F. Port forwarding / redirect
# Redirect incoming port 80 to local port 8080
sudo firewall-cmd --permanent --zone=public \
  --add-forward-port=port=80:proto=tcp:toport=8080
sudo firewall-cmd --reload

# Forward to a different host (requires masquerade)
sudo firewall-cmd --permanent --zone=public --add-masquerade
sudo firewall-cmd --permanent --zone=public \
  --add-forward-port=port=3306:proto=tcp:toaddr=192.168.1.20:toport=3306
sudo firewall-cmd --reload
G. Source-based zone assignment
sudo firewall-cmd --permanent --zone=trusted --add-source=192.168.1.0/24
sudo firewall-cmd --reload
H. Panic mode — emergency kill switch
# Drops ALL traffic immediately — use only from physical/console access
# Running this over SSH will instantly disconnect you
sudo firewall-cmd --panic-on
sudo firewall-cmd --query-panic

# Restore normal operation
sudo firewall-cmd --panic-off
12) Troubleshooting and verification
sudo ss -tulpn          # Listening ports
docker ps               # Running containers
sudo nginx -t           # Test Nginx config
sudo journalctl -u firewalld
sudo firewall-cmd --list-all| Problem | Likely cause | Fix |
|---|---|---|
| Site not reachable | HTTP/HTTPS service not opened | Add http/https service and reload |
| App port exposed publicly | Docker published to all interfaces | Bind to 127.0.0.1 instead |
| Nginx proxy fails | App not listening on localhost port | Check app process and Nginx upstream target |
| Rules disappear after reboot | Runtime change only | Use --permanent and reload |
Recommended final setup
Internet → Nginx (80/443) → localhost app/container → database internal only
This is the cleanest and safest pattern for most Ubuntu developer servers in 2026.